
← old cassettes and camcorder tapes, rescued
How to Digitize Cassette Tapes (With Free Audacity, Step by Step)
Step by step: plug your cassette player in by USB, record each side in free Audacity, and export as WAV to keep or MP3 to share.
 Gus Harmon · Updated August 22, 2026 · how I decide
If you buy through my links the site earns a little. It's never why I pick things.
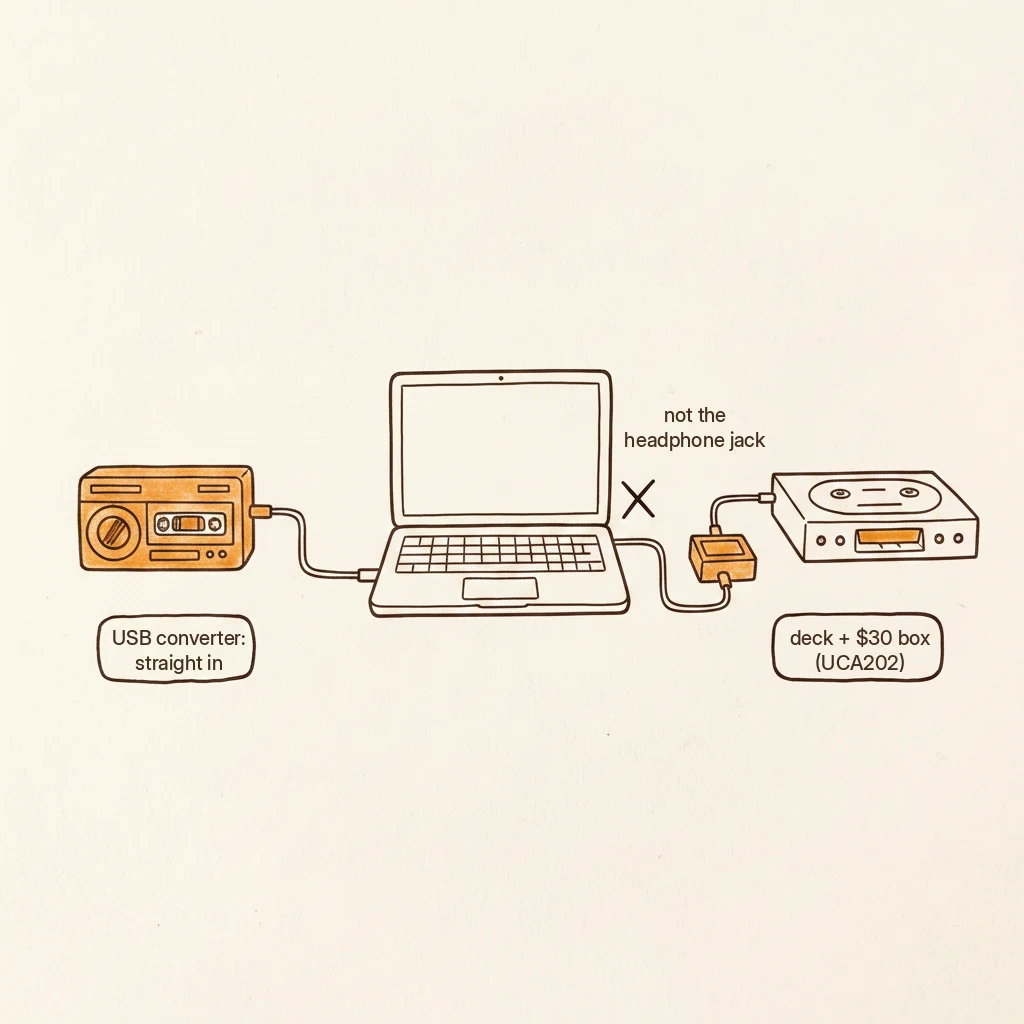
Plug your cassette player into the computer by USB, a converter or a deck through a small Behringer UCA202. Open Audacity (free), set it to record from that USB device, not the laptop mic, and press Record. Keep the meter out of the red. Export as WAV to keep or MP3 to share. A sixty-minute tape takes sixty minutes.
If you buy through my links the site earns a little coffee money. Doesn’t change the price, doesn’t change my answer.
If you haven’t picked a road yet, start with the honest ladder. Pass on anything that says “converts to CD” (you want files, not discs), and pass on any service that returns recordings only through their own cloud login. This page picks up with the laptop open and the tape in your hand.
It doesn’t matter if it says Maxell, TDK, or nothing at all on the shell. Same steps either way.
What's on this page
Before you press Record
Two things before anything else.
Clean the playback head and the pinch roller. A cotton swab and rubbing alcohol, and years of dust come off. If the player sounds slow, warbles, or won’t spin at all, that’s the belt, and it gets sorted before you feed the player a precious tape.
Run the tape all the way forward and then all the way back. One full pass loosens up a tape that sat wound tight for years.
In Audacity, check that the project rate says 44,100 Hz. It usually does by default. Leave it there.
The right plug, the right hole
If you bought a USB cassette converter, this part takes five seconds. Plug the USB cable into the computer. Done. Audacity will see it.
If you’re running a tape deck, you need a small box in the middle. The deck’s outputs (the red and white plugs on the back) go into the box, and the box connects to your computer by USB. A Behringer UCA202 runs about $30 and handles the job. There’s a full section on that road below.
One road that looks simpler but isn’t: plugging the player’s headphone jack straight into the laptop. Most laptops in 2026 have one combo jack, and it’s a microphone input. That’s the wrong kind of input for a headphone signal. Twelve years behind a church mixing board taught me the difference, because it’s the first thing every volunteer gets wrong.
A mic input expects a tiny signal and adds its own boost. A headphone output is already loud, so the boost clips and what you get sounds crunchy and distorted.
The USB box skips that problem for about thirty dollars.
If your converter has a volume wheel, make sure it’s turned up before you start. Some ship set to zero, and you’ll record silence wondering what went wrong.
How to capture a cassette tape in Audacity
Open Audacity. Before you press Record, check three dropdowns in the toolbar.
Recording device: pick the one that mentions USB. If you’re using a UCA202, it shows up as “USB Audio CODEC.” Do not pick anything that says “Microphone” or “Realtek” or “Internal.” That’s the laptop’s built-in mic, and it will record the room instead of the tape.
The forum thread where someone recorded a whole side of silence, trying every setting, came down to this: Audacity was listening to the wrong device. One dropdown, and the whole problem disappears.
Audio Host: it probably says MME or WASAPI. Either one works with these USB devices. Leave it on whichever Audacity already picked.
Playback device: your computer’s speakers or headphones, not the USB box. You want to hear the tape through your own speakers while it records through the USB device.
Now do a test run. Cue the tape to a loud part, press Record, and let thirty seconds play. Watch the meter at the top of the screen. You want peaks landing in the green, with maybe a touch of yellow. If the meter hits red, turn the player’s volume down (the knob on the player or the converter, not a slider in Audacity). If the meter barely moves, turn it up.
Once the test looks right, rewind to the beginning of the side. Press Record. Press Play on the tape player. Walk away if you want to. The tape plays, Audacity captures, and when the side ends, press Stop.
Both sides in one sitting, then split the songs
You can do both sides without closing anything. When side A ends, press Pause, flip the tape, and press Pause again to keep going. Audacity adds side B right after side A.
To split a tape full of songs into separate files, click the quiet gap between two songs in the waveform and press Ctrl+B. A label appears. Type the song name. Do that for every gap.
Then go to File, Export Audio, and choose Multiple Files. Audacity saves each labeled section as its own file, numbered and named.
If it’s a voice tape, skip the labeling. One file per side. Dad talking is not a track list.
Cassette to MP3 or WAV
Go to File, Export Audio.
For the copy you keep: WAV. Full, uncompressed sound, same quality the tape just played. The default settings (44,100 Hz, 16-bit) are right. Leave them.
For the copy you text to your sister: MP3. Smaller file, plays on everything.
Export the WAV first, before any cleanup. That’s your safety copy. If you try to clean up the hiss and take it too far, you come back to this file and start fresh.
Cleaning up the tape hiss (do this last, or skip it)
This is optional. Plenty of people leave the recording alone and are perfectly happy with it. Tape hiss is part of the memory for some of us.
If you want to reduce it, do it in this order.
First, grab a noise profile. Find a spot where nobody’s talking and nothing’s playing, just the hiss. Select about one second of it. Go to Effect, Noise Reduction, and click “Get Noise Profile.”
Then apply it. Select the whole recording (Ctrl+A), go back to Effect, Noise Reduction, and click OK. Audacity’s own tape workflow suggests 9 dB of reduction with the sensitivity at 6. Don’t crank it higher or voices start sounding like they’re underwater.
Last, bring the volume up. Effect, Normalize, set it to about -2 dB. This brings everything up to a comfortable listening level so you’re not reaching for the volume knob.
Everything else (fades, compression, equalization) is garnish. You don’t need it for a cassette transfer.
When something goes wrong
You press Record and see a flat line
Four things to check, in order.
- Wrong recording device selected. Go back to the dropdown and make sure it says USB, not laptop mic.
- Wrong hole. The cable should be in a USB port, not the headphone jack.
- Windows is blocking the device. Check the microphone privacy settings and make sure Audacity has permission to use it.
- The converter’s volume is at zero. Some have a small wheel. Turn it up.
If you want to prove the signal is reaching the computer before you blame Audacity, open Windows Sound Settings and check “Listen to this device” on the USB input. If you hear the tape through your speakers, the signal is there and Audacity just needs the right dropdown.
Why is my Audacity recording so quiet
Two usual reasons. The player’s volume is turned low, so turn it up. Or the signal is going through the laptop’s mic input instead of the USB device. Check the recording-device dropdown first.
Why does my recording sound muffled
Dirty playback heads. Clean them with a swab and rubbing alcohol. If the sound warbles or drags, the belt is probably tired. That’s a player problem, not an Audacity problem.
Why does my recording sound bad or distorted
The signal is too loud. Turn the player’s volume down until the meter stays out of the red. Green, a touch of yellow. Never red.
The Behringer UCA202 and a real tape deck
If you already own a tape deck that plays well, this is the better-sounding road. The deck’s red and white plugs go into the UCA202’s matching inputs. USB from the UCA202 to the computer. No drivers to install for recording. It just works.
The UCA202 runs about $30 and doesn’t take up much room. The people who use them for this work keep saying the same thing: any USB box that takes the load off the laptop’s built-in sound chip gives you noticeably better results. For a shoebox of tapes, that’s the argument for spending the thirty dollars.
Everything from the recording steps above applies the same way. Audacity sees the UCA202 as “USB Audio CODEC.” Pick that in the recording-device dropdown and go.
One more level exists: a proper recording interface running from a reference-grade deck at higher sample rates. That’s the deep end, not for the shoebox. If you own a Nakamichi, you already know.
Test record thirty seconds of the loudest song, look at the meter, then walk away and let the whole side run while you make dinner. Split it tomorrow.
Questions people actually ask
Does the brand on the tape matter?
Whether it says Maxell, TDK, or nothing at all, the steps are the same. The brand on the shell affects how well the tape held up over the years, not how you digitize it.
Should I record in mono or stereo?
Stereo for music tapes. Mono is fine for voice recordings and cuts the file size in half. If you’re not sure, leave it on stereo.
Can I just plug the headphone jack into my laptop?
It can work. Some people do exactly that and get a fine recording. It can also clip and distort because the laptop’s mic input isn’t built for that signal. It’s the roll of the dice you’re avoiding for about thirty dollars.
Can I use VLC or a video editor instead of Audacity?
VLC and video editors play files. They’re not built to capture audio from an outside source. Audacity is free, it’s made for exactly this, and it’s what everyone doing this work reaches for. Same bar as everything here: what I’d hand my own sister, not what a box says.
Working through a box of tapes, you're probably also wondering:
Gus Harmon
Gus spent three decades running sound wherever somebody needed it: bar bands, weddings, school shows, and twelve years of Sunday mornings. He can't sing a note. He can make sure you're heard. Now he writes so normal people can buy the right thing the first time.